メンバーGoogleのextentionの作り方-クローリング編-
Googleのextentionの作り方-クローリング編-
こんにちは山本です。
突然ですが、googleのエクステンションはみなさん使っていますよね
画面をスクショしたり、画面要素を測ったり、フォントを調べたり、uaを変えたり、カラーコードをとったりといろいろ便利なエクステンションがあります。
今日はこれ作っちゃおうかなって思います。
というわけでさくっとやっていきます。
何を作ろうかな…
そうですね、
よく、あるキーワードで検索したときのサイトタイトルとURLとdescriptionが20件欲しいことがあるのでそれを一瞬で作るようなエクステンションを作りましょうか。
意味はないですがささっとまさしくといういみで「ささまさ」という名前のエクステンションにします。
まずデスクトップに
sasamasaというフォルダを作ります
その中に
このファイルを作ってください
├── background.js
├── icon.png
├── manifest.json
├── popup.html
└── popup.js
5つのファイルです。
icon.pngは適当に作ってください。
それではそれぞれのファイルのコードを書いていきます。
background.jsは
chrome.action.onClicked.addListener(() => {
  chrome.windows.create({
    url: 'popup.html',
    type: 'popup',
    width: 400, // ウィンドウの幅を調整
    height: 600 // ウィンドウの高さを調整
  });
});
はい、これだけ、
エクステンションボタンが押されたらpopup.htmlを別ウインドウで開いてねってコードですね。
じゃ、popup.htmlを書いていきましょう
<!DOCTYPE html>
<html lang="ja">
<head>
  <title>Sasamasa Search</title>
  <meta charset="utf-8">
  <style>
    body {
      min-width: 300px;
      min-height: 600px;
      font-family: Arial, sans-serif;
      overflow: hidden;
    }
    #results {
      white-space: pre-wrap;
      overflow-y: auto;
      max-height: 400px;
    }
    #container {
      position: relative;
      cursor: move;
      padding: 10px;
    }
    #closeButton {
      margin-top: 20px;
      display: block;
    }
  </style>
</head>
<body>
  <div id="container">
    <h3>Sasamasa Google検索</h3>
    <form id="searchForm">
      <label for="query">検索ワード:</label>
      <input type="text" id="query" placeholder="検索ワードを入力" required>
      <br>
      <label for="startFrom">取得開始位置:</label>
      <input type="number" id="startFrom" min="1" value="1">
      <br>
      <button type="submit">検索</button>
    </form>
    <div id="results"></div>
    <button id="closeButton">画面を閉じる</button>
  </div>

  <script src="popup.js"></script>
</body>
</html>
こんな感じですね。
画面閉じたかったら画面を閉じるボタンを押せばいいし、
検索は検索ボタンを押せばいいと、
あといくつめの結果から欲しいですかというのを指定できるようにもしました
おもいっくそpopup.jsが読み込まれてるのでそれを書いていきます。
popup.js
document.getElementById('searchForm').addEventListener('submit', async (e) => {
  e.preventDefault();
  const query = document.getElementById('query').value;
  const startFrom = parseInt(document.getElementById('startFrom').value, 10) - 1; // 0-indexドで-1
  const resultsDiv = document.getElementById('results');

  // 結果をクリア
  resultsDiv.innerHTML = '読み込み中...';

  // Google Custom Search APIの設定
  const apiKey = 'AIzaSyAsduQzRlOU42e7Q6koueunAq0e2s_BKGBVrJG1s'; // ダミーです。
  const cx = 'c2292cd3ad7e1654fed'; // これはダミーですカスタム検索エンジンID

  try {
    // 2回に分けてリクエストを送り、20件の結果を取得
    //googleのAPIが一回で10件しかとってこれないからね。
    const items = [];

    // 最初の10件
    const searchUrl1 = `https://www.googleapis.com/customsearch/v1?q=${encodeURIComponent(query)}&cx=${cx}&key=${apiKey}&start=1&num=10`;
    const response1 = await fetch(searchUrl1);
    const data1 = await response1.json();

    if (data1.error) {
      resultsDiv.innerHTML = `APIエラー: ${data1.error.message}`;
      return;
    }

    items.push(...data1.items);

    // 次の10件
    const searchUrl2 = `https://www.googleapis.com/customsearch/v1?q=${encodeURIComponent(query)}&cx=${cx}&key=${apiKey}&start=11&num=10`;
    const response2 = await fetch(searchUrl2);
    const data2 = await response2.json();

    if (data2.error) {
      resultsDiv.innerHTML = `APIエラー: ${data2.error.message}`;
      return;
    }

    items.push(...data2.items);

    // 各サイトの情報を取得して表示
    displayResults(items, startFrom);
  } catch (error) {
    resultsDiv.innerHTML = `エラー: ${error.message}`;
  }
});

function displayResults(items, startFrom) {
  const resultsDiv = document.getElementById('results');

  items.forEach((item, index) => {
    if (index >= startFrom) {
      try {
        // 各要素を取得
        const title = item.title || 'タイトルなし';
        const url = item.link || 'URLなし';
        const snippet = item.snippet || 'スニペットなし';

        // クリック可能なリンクにする
        const result = `
          <div>
            ${index + 1}. <a href="${url}" target="_blank">${title}</a><br>
            <a href="${url}" target="_blank">${url}</a><br>
            ${snippet}
          </div>
          <hr>
        `;

        // 結果を表示
        resultsDiv.innerHTML += result;
      } catch (err) {
        // エラーが発生した場合、理由を表示して次へ進む
        const errorResult = `${index + 1}. 取得エラー\n理由: ${err.message}\n------------`;
        resultsDiv.innerHTML += errorResult + '\n\n';
      }
    }
  });
}

// 「画面を閉じる」ボタンの動作
document.getElementById('closeButton').addEventListener('click', () => {
  window.close();
});

// ドラッグでポップアップを移動
let isDragging = false;
let offsetX, offsetY;

const container = document.getElementById('container');

container.addEventListener('mousedown', (e) => {
  isDragging = true;
  offsetX = e.clientX - container.offsetLeft;
  offsetY = e.clientY - container.offsetTop;
});

document.addEventListener('mousemove', (e) => {
  if (isDragging) {
    container.style.left = `${e.clientX - offsetX}px`;
    container.style.top = `${e.clientY - offsetY}px`;
    container.style.position = 'absolute';
  }
});

document.addEventListener('mouseup', () => {
  isDragging = false;
});
はい、ここで、
google APIのキーが2種類必要だとわかりますね?
custom search api
. Google Custom Search API の準備
- Google API Console にアクセス: https://console.developers.google.com/
- 新しいプロジェクトを作成 または既存のプロジェクトを選択します。
- APIとサービス > ライブラリ に移動し、Custom Search API を有効化します。
- APIとサービス > 認証情報 に移動し、APIキー を作成します。このAPIキーは後で使用します。
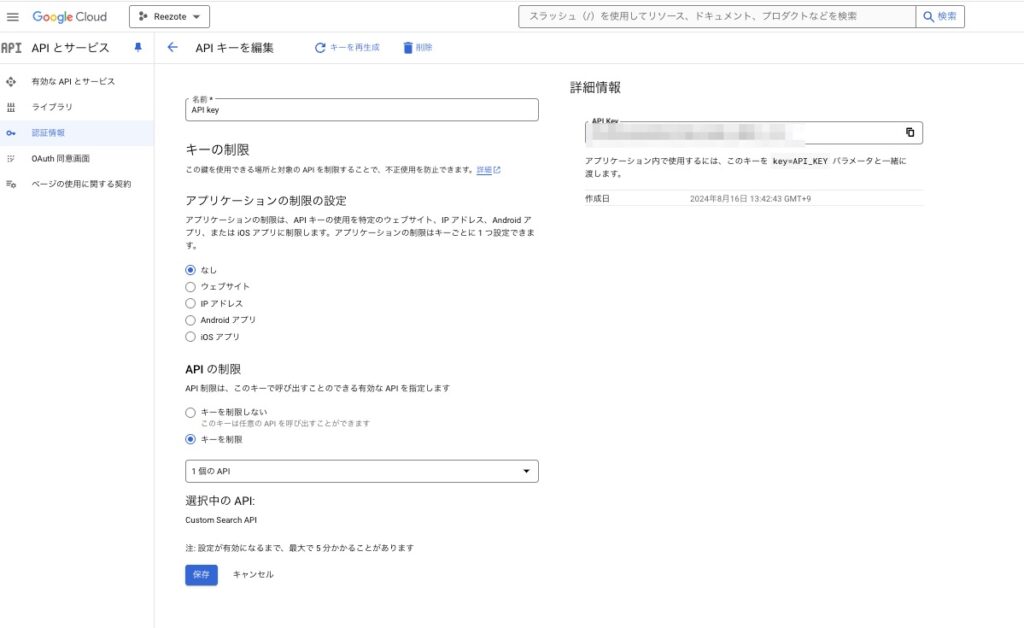
カスタム検索エンジンIDの取得方法
- Google カスタム検索エンジンのページにアクセス
https://cse.google.com/cse/ - 新しい検索エンジンを作成
- ページ右上にある「新しい検索エンジンを作成」ボタンをクリックします。
- 「検索するサイト」の欄に「
google.com」と入力して、すべてのサイトを検索対象にします。 - 「検索エンジン名」に好きな名前を入力し、「作成」ボタンをクリックします。
- カスタム検索エンジンIDを取得
- 検索エンジンが作成されると、「カスタム検索エンジンの設定」ページにリダイレクトされます。
- そのページの「基本」セクションにある「検索エンジンID」の欄に、一意のIDが表示されます。
- これが その値です。
- このIDを控えておき、コード内の
cxの部分に設定します。
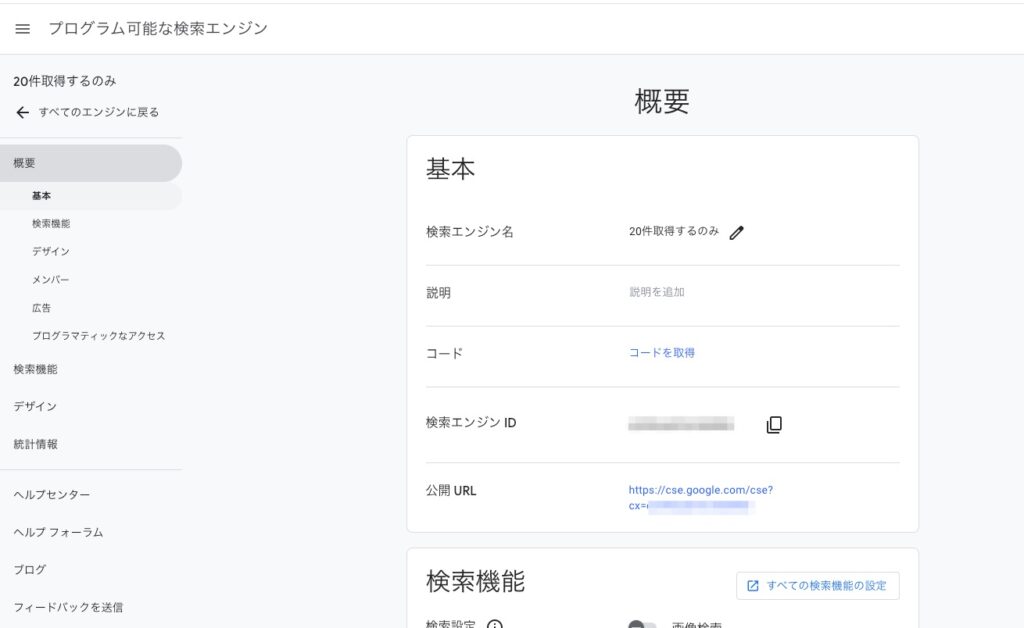
はい、これで値を差し替えてくださいね。
manifest.jsonを作成
{
  "manifest_version": 3,
  "name": "Sasamasa Search",
  "version": "1.0",
  "description": "Google検索を行い、タイトル、ディスクリプション、URL、ヘッダー情報を取得します。",
  "permissions": ["activeTab", "scripting"],
  "background": {
    "service_worker": "background.js"
  },
  "action": {
    "default_title": "Sasamasa Search"
  }
}
はい、これで完了
これらのファイルを作ったら
拡張機能の登録
- Chromeを開き、アドレスバーに
chrome://extensions/と入力します。 - 「デベロッパーモード」をオンにします(右上のスイッチ)。
- 「パッケージ化されていない拡張機能を読み込む」ボタンをクリックします。
- デスクトップにある
sasamasaフォルダを選択します。
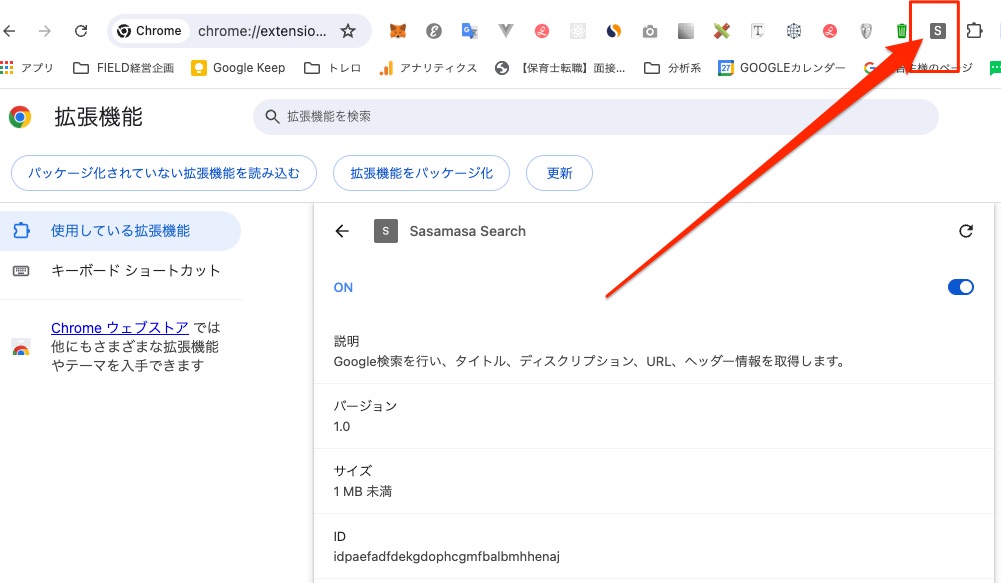
そうすると
このようにbookmark部分にできますから
それをクリックすると
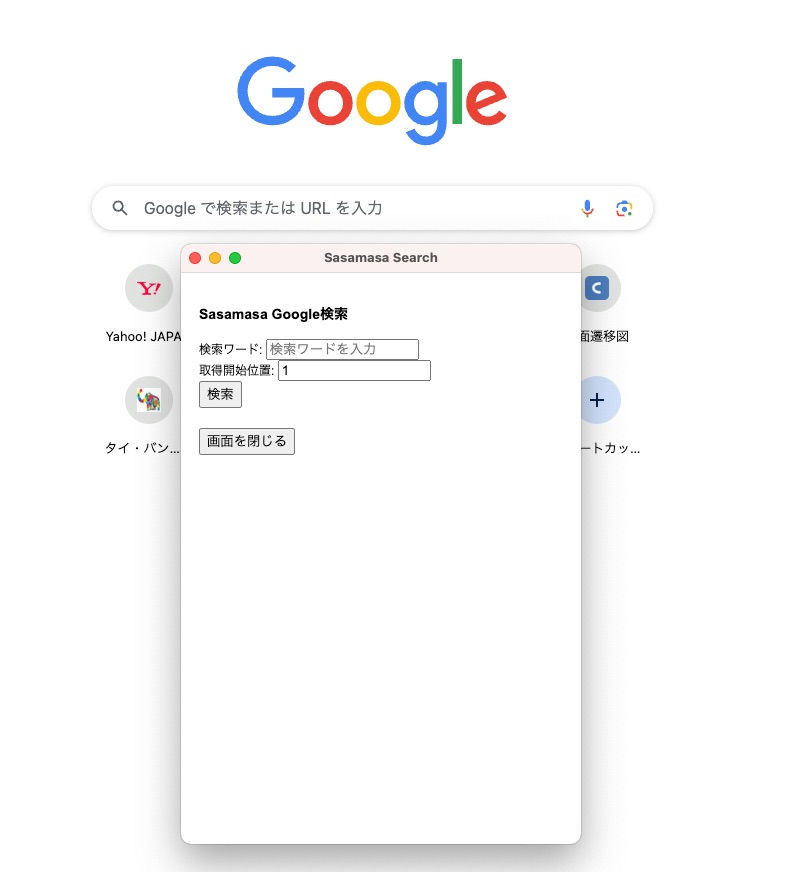
でてきたーーー!
検索してみましょう。
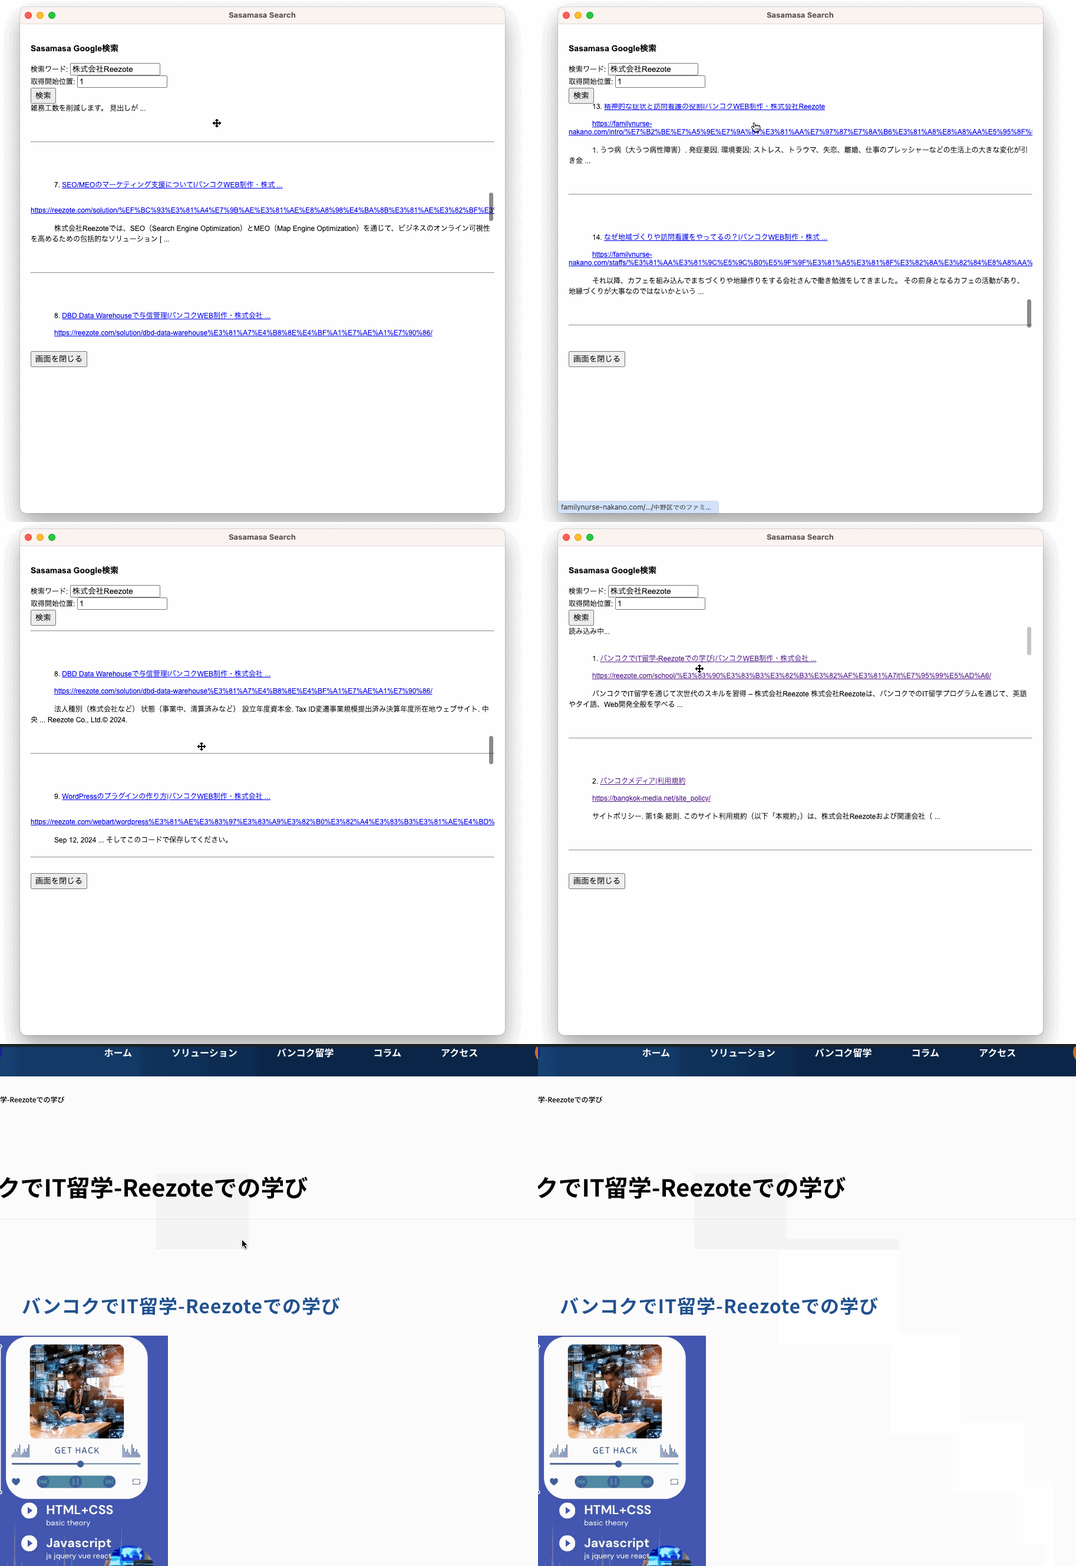
できてますね。
このようにエクステンションを作ります。
この開発にかかった時間は25分でした。
超楽勝だと思います。


